Making a Magical Whereabouts Clock
For Christmas of 2015, I made my then girlfriend (now wife!) a Magical Whereabouts Clock. I figured it's about time to share it with the world as well. This turned out to be an incredibly fun and challenging project.
Background Research🔗
So starting out, I had no idea how to build a clock. I was pretty confident as far as the electronics and programming go, but the mechanics and art of it were pretty foreign. Fortunately, there have been some excellent earlier examples to learn from.
Over at Rae Gun Ramblings you can find a really nice looking example. I love the design of the clock face, and the technique she used for the hands. I ended up using a poor approximation to make my clock's own hands.
I knew I was going to need some gears, some kind of a shaft, hands, motors, etc. I knew all the clock hands would need to move independently. I wasn't sure what to make the clock shaft out of, and to this day I still can't figure out the right term to Google for. I realized there are people who make clocks as a hobby or for a living, so I tried to see what they do. It turns out most people just buy a ready-made clock movement, like this one $ . This wouldn't work so well for me, since their hands all move the way they're supposed to in order to keep time, but I'd learned an important fact: the whole clock mechanism is called a movement.
There is a truly excellent build by Brad Collette over at themagicclock.com. This one made use of servo motors controlled by an Arduino to move the hands, and took commands over wifi via a hacked router. It has a gorgeous etched brass clock face too! I took a lot from the detailed clock movement build, including realizing that I could use brass tubes from K&S for the shaft. Each tube size conveniently fits inside the next larger one. I suspect that's not an accident. Brad also pointed to the nice assortment of gears and hubs over at ServoCity.
Armed with this new knowledge, I was ready to start working on my own take on the Magical Whereabouts Clock.
Designing and Building the Movement🔗
Because of the number of parts I had to manage to fit together, I decided to design this using Onshape. I had dabbled with Onshape a little in the past and I found I was able to get up and running with it pretty quickly and easily. That said, this design involved a lot of iteration which got tedious at times, but I suspect that would be true no matter what software I was using. Onshape's support for constraints helped a lot, but I still had to be careful because sometimes it would completely fail to solve the constraints and instead explode the components all across the screen.
I built the movement from of a lot of off-the-shelf components. Originally I was thinking I might 3d print some of the parts, but given that I wanted to get this done by Christmas, I decided I didn't want to spend a lot of time fiddling with the printer.
The frame is made out of acrylic sheets and 3mm threaded rod. The threaded rod also served as a place to mount the motors. In retrospect, this didn't work quite as well as I had hoped. The rods were more flexible than I wanted, and threading them through two motors each made it difficult to get the motor positions exactly right.
I tried a several different parts arrangements. Originally I had one motor on each of the four sides, but this way was too deep. In order to be able to fit it into a clock, I needed to get the depth down. That led me to the final version, with two motors per side. Furthermore, I found that by reversing the motors on one side, I could shave a little more off the depths. This is how I ended up with the movement design shown below.
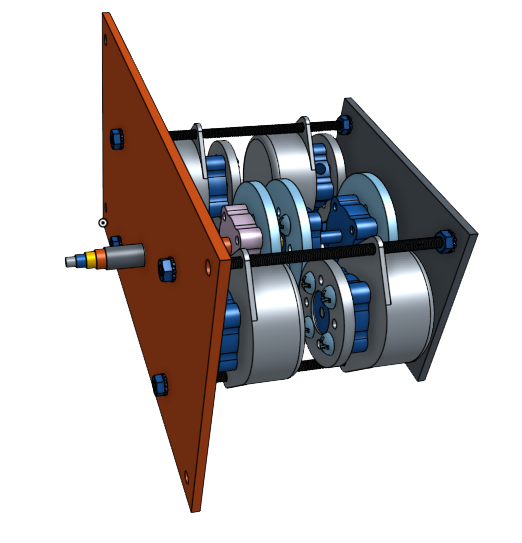
Getting all the lengths just right proved to be kind of a challenge, particularly for the clock shaft. I needed them to line up well on the face side, but also end at the right spot on the gear side. The math felt like it should have been some simple addition and subtraction, but for some reason this took me a long time to get right.
For me, one of the big advantages of designing this all in CAD to start with was that I could print out to-scale mechanical drawings. This made it a lot easier to measure everything when I was cutting, and also gave me a nice template for drilling the front and back plates.
Electronics and Software🔗
For the electronics and software, I wanted to get as close as I could to an actual magic clock. This means the hands should move naturally and automatically. I didn't want to have to manually adjust the hands when one of us changed locations. My goal was to have our phones automatically send out location to the clock and update the hands accordingly. Besides one hand for me and my wife, there were two additional hands. I decided these should be used to tell time.
In order to meet these requirements, I needed an Internet-connected clock. The easiest way to do this seemed to be using a Particle Photon, which I could program like an Arduino but also included WiFi and some nice cloud features. For example, I was about to move two thousand miles away, so being able to update the firmware over the Internet was appealing (I didn't actually do this; we got married and moved in together before I had the chance to make any updates).
To make the hands move, I needed to connect them to motors. Most similar projects I've seen use servo motors, and it seems like these are the staple of many moving maker projects. One of my key requirements is that the hands would move like a real clock's hands, meaning I needed 360 degree rotation. The best option looked to be stepper motors, although I wonder how continuous-rotation servos would have worked.
It turns out SparkFun made a nice board that could drive four stepper motors at once. This exactly what I needed! (That board is now discontinued, but it looks like this one might be similar.)
On the client side, my original plan was to throw together a simple phone app that would let you set the position of your hand directly, and also allow you to set rules to move the hands when you go to specific locations. It doesn't sound like too complicated of an app, but I also don't have a ton of experience here and I had to be choosy about what aspects of this project I spent time on. I realized IFTTT and it's Particle integration would let me cobble together a few rules and Do buttons that would give a functional approximation of what I wanted. I could always make the custom app in the future.
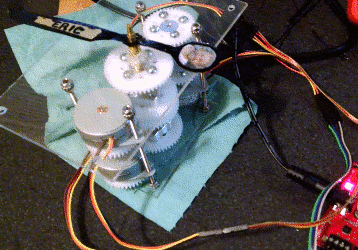
I kept the software pretty simple, because I wanted to get something running quickly. The first order of business was to get control of the motors. For many of Sparkfun's boards, they provide Arduino libraries to get up and running quickly. That was not the case for the QuadStepper though. I had to write my own control code based on what was in the datasheet. On the bright side, the controller chips on that board are pretty high level, so it's mostly a matter of setting the right values on the right pins to make the motors go. Still, a lot of what was in the datasheet was non-obvious to me and there was a lot of trial and error.
Here's how it looked once I had gotten control of the motors.
The next order of business was to get the clock connected to the Internet. At first I looked at Particle's event system. This seemed like what I wanted; our phone's could publish a stream of events of location changes and the clock would respond by moving our corresponding hands. I settled on a simpler option, functions. I created a function to set each of our hands' positions based on a string name for the location (such as "work," "traveling," or my favorite, "mortal peril").
Then, I could cobble together a bunch of IFTTT applets to update our location on the clock. The simplest thing was to just create a Button widget for each location that we could push manually. When we were feeling more ambitious, we'd create an applet using the Location service to do this all automatically. I'm sure we could do a lot more too, such moving my hand to traveling when my phone connects to my car via Bluetooth.
Ideally, I would have liked to have created my own app that does all these things automatically. IFTTT let us get a lot of the functionality we wanted with a lot less work.
One of the things that was trickier than I expected was getting the hands to take the shortest path from their current location to their target location. For example, when going from 11:00 to 1:00, the hands went the long way around at first. It's not fundamentally a hard problem, but I did get it wrong more times than I care to admit.
Another currently unsolved problem is telling where the hands are. Basically, the clock software knows where it thinks the hands are and where they should be, but there is no way for the clock to tell if this matches reality. I thought about rigging up some kind of encoder so that it would be possible to tell, but this was more complex than I had time for. Instead, I made it so you could use the Particle console to tell the clock where the hands actually were when you power it up, and then it would go from there. Also, I made the clock save the hand's location each time it moved so that if the clock did lose power and no one touched anything, then everything would work automatically once it powered back up.
Putting It All Together🔗
Now that I knew how to build a movement and had a plan for the electronics and software, it was time to put it all together. In order to look convincing, this needed an enclosure to hold it all. I considered building one, but fine furniture making is not a skill I felt like developing in the time I had. Instead, I tried to find a good donor clock with a case that looked like I wanted. I shopped around a lot, but most clocks were either too small (the movement needed at least 8.5cm of depth), or rather expensive. I had better luck with pawn shops, and eventually found what looked like a workable clock. Incidentally, I just recently found out this clock retails $ for far more than I paid for it. It kind of makes me feel bad about ripping out all of its guts.
Anyway, the build process is better shown than told, so below is a slideshow of various stages of the build along with comments about what's going on.
I didn't quite get it done in time for Christmas, but I got it to her a couple days afterwards. She loved it!